
The default Toolchain and Development-Tools from STM for STM32 are great. They have almost everything I need for developing embedded software on the STM32 microcontrollers. However, I really like the modern look of Visual Studio Code (VSC). If you are bored of the Eclipse-based IDE like STM32CubeIDE, you are like me. Even though VSC is a source-code-editor, it can be used as a powerful IDE with the right Plugins and settings. Another advantage of using independent IDE like VSC is the cross-plattform ability. You can use VSC on Windows, Linux or MAC. You can use VSC for development of different kind of Microcontrollers from different providers.
Now, i will show you my current settings for Visual Studio Code for developing embedded software on STM32 Plattform. In the next time, i will talk about ESP32 or Arduino Boards.
Tools
First of all, lets look through the following list of tools that I’m using right now:
- STM32CubeProgrammer for loading binary firmware to the MCU
- STM32CubeMX for the Pin-Configuration and Code-Generation
- STM32CubeIDE for it’s debugging toolchain
-** Vistual Studio Code** with the following Plugins:
- C/C++ Extension Pack, which includes 9 necessary Plugins for developing C/C++
- Cortex-Debug to debug and download binaries on to ARM-Cortex MCUs
-
GNU ARM Embedded Toolchain: Take a look at the ARM-Developer Website. On Windows, you can download the
.exeinstaller. On Linux and MAC, take a look at this article - On Windows, you will need
makeorcmakeprogram to build automatically executable programs, or in the case of embedded, binary firmware. You have multiple choices for themaketool. I use bothmsys2andwsl2on my Windows10 laptop, so that I can get used to the Linux development environment. An Advantage of WSL2 is that Visual Studio Code can open inside this environment with theRemote-WSLPlugins from Microsoft.
The installtion of STM32Cube Programs require an account on the STM Website. Download and install them all by default. If you change the installtion path of STMCubeIDE, the Plugin Cortex-debug cannot find what it needs to start the debugger server.
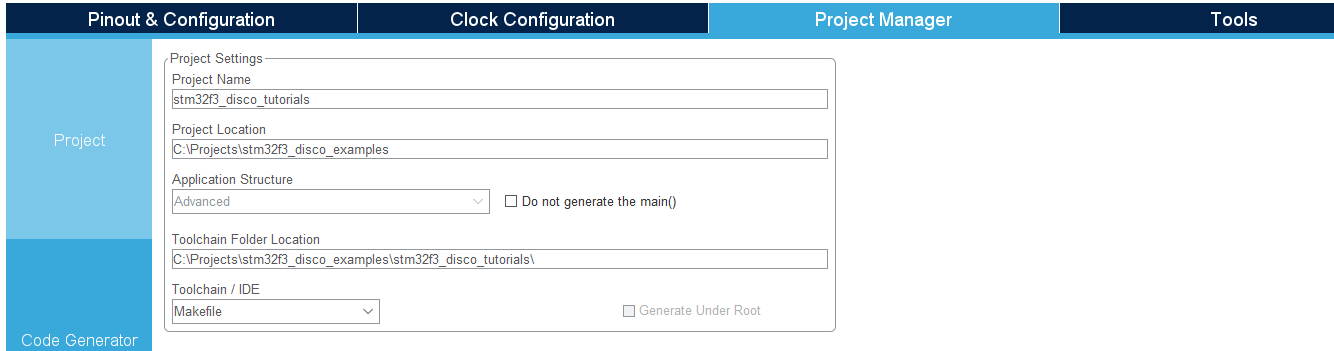
Create a new project with STM32CubeMX
After done with the installation of the required tools and software, it’s time to start coding and to create a new project.
I find the automatically generate codes from the STM32CubeMX pretty pratical, especially when it is possible to create project for make. The source codes that are created by CubeMX includes however a lot of comments, which are used for the detection between your own codees and the generated one.
So, the first step is to create a new project with STM32CubeMX. After finishing the configuration of your microcontroller, go to Project Manager Tab and select Makefile as Toolchain / IDE in the Project. The STM32CubeMX will generate a Makefile project automatically, which will be used by VSC for the development. After that, click on Generate Code.
Now, go to your project folder, open your command prompt. A fast way to open command prompt is to go to the address bar on the Windows Explorer, delete all and type in cmd, Enter and a command prompt in the opening folder will be opened.
You can see that the project folder has the following structure:
- Core
- Inc
- Src
- Drivers
- HAL Drivers
- CMSIS
- Middlewars
- Makefile
- startup_stm32_abcdef.s
- STM32ABCDEF_FLASH.ld
Depending on development board and the application of each board, the structure might be slightly different. However, the Makefile, Linker and Startup will always be there.
Build the Code
Type in the opening command prompt make to build the project with the Makefile. You can use parallel processing in building the project with make -j8 for example of 8 parallel build process. The output on the command prompt should look like this:
arm-none-eabi-size build/stm32f3_disco_tutorials.elf
   text    data     bss     dec     hex filename
  26504     556    6292   33352    8248 build/stm32f3_disco_tutorials.elf
arm-none-eabi-objcopy -O ihex build/stm32f3_disco_tutorials.elf build/stm32f3_disco_tutorials.hex
arm-none-eabi-objcopy -O binary -S build/stm32f3_disco_tutorials.elf build/stm32f3_disco_tutorials.bin
This means that the build of the firmware is successfully saved in the folder ./build, in different formats .hex, .bin and ``.elf`. The differences between these files will be written someday.
You can configure VSCode to run make to build your firmware by using tasks:
{
    // See https://go.microsoft.com/fwlink/?LinkId=733558
    // for the documentation about the tasks.json format
    "version": "2.0.0",
    "tasks": [
        {
            "label": "make",
            "type": "shell",
            "command": "make",
            "problemMatcher": [
                "$gcc"
            ],
            "group": {
                "kind": "build",
                "isDefault": true
            }
        },
        {
            "label": "make clean",
            "type": "shell",
            "command": "make clean",
            "options": {
                "cwd": "${workspaceFolder}"
            },
            "problemMatcher": [
                "$gcc"
            ]
        }
    ]
}
With this configuration, you can build your firmware with the default Run Build Task in VSCode by using the shortcut Ctrl+Shift+B.
Run and Debug the Code
Now, you shoudl have isntalled the Extension Cortex-Debug. You will need a launch.json in order to running debug on STM32 microcontrollers. It should look like this:
{
    // Use IntelliSense to learn about possible attributes.
    // Hover to view descriptions of existing attributes.
    // For more information, visit: https://go.microsoft.com/fwlink/?linkid=830387
    "version": "0.2.0",
    "configurations": [
        {
            "cwd": "${workspaceRoot}",
            "executable": "./build/stm32f3_disco_tutorials.elf",
            "name": "Debug STM32F3 stlink",
            "device": "STM32F3",
            "request": "launch",
            "type": "cortex-debug",
            "showDevDebugOutput": true,
            "servertype": "stlink",
            "runToMain": true,
        }
    ]
}
Change the configuration to pass your project. Now, you can go to Run and Debug in VSCode or use shortcut Ctrl+Shift+D. You shoud see the debug mode here:
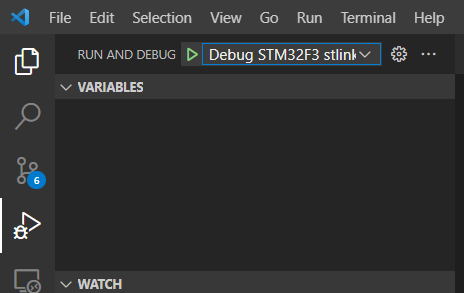
Click the Play Button to start debugging.